Showing posts with label DIY. Show all posts

Tuesday, March 26, 2013

Happy birthday cards (silhouette craft).

Unfortunately, I think I mis-addressed this card, resulting in it never being received. Shucks.
I made a few more birthday cards, and a Valentine's day card last month using the Silhouette. I'm getting more comfortable using it, and there's less error in my trial and error process now. These 3 designs are all pretty simple, so I'll just give you a quick rundown of how I made them. I have a box of blank 4.25" by 5.5" cards and envelopes, so I use those as the base when I am making cards to mail.

For the first card (above), I simply chose a font I liked, and laid it out with the balloons. I put a rounded rectangle that was slightly smaller than my card around the design, and then I cut it out. I glued the design to the front of the card, then colored in the balloons with colored pencils. Easy and cute.

Wednesday, February 27, 2013

Balloon birthday card (DIY).

I've been playing around with my Silhouette Cameo, and I am slowly learning how to do new things with it. I mainly use it to create stencils for the glass etching that I do for my Etsy shop, but I know it can be used for so much more than that. This is the first birthday card that I made with it, and I did this mostly through trial and error (I thought I knew what I was doing, and didn't need directions, so I ended up wasting a few pieces of paper...). I have a few more cards to show you soon, but I want to wait until after they've been received.

The balloons are a design that came free with the Silhouette. I separated them and cut each balloon individually instead of as a bunch. The bow was part of the same design (there were strings too, but I opted to draw strings on instead). The rest of the design is simply text cut out of an oval (I hand trimmed the edges of the oval after gluing it to the card), with pink paper underneath. I'm having fun learning how to create cards with the Silhouette, and I'm hoping to get back into making handmade birthday cards for everyone. The design process is still slow for me, but luckily there are thousands of fantastic pre-made designs in the Silhouette store (and they give everyone a new free design every week).
I added another bunch of balloons on the inside of the card.
Pin It I link up to these parties.

Friday, October 5, 2012

Removing jar labels (testing Pinterest).

If you're anything like me, you have about a gazillion things pinned that you want to try out "someday." Well, last week I decided that "someday" had finally come for a few of those pins. The first one I tested was this pin from Don't Waste the Crumbs on removing stubborn jar labels.

Jars make simple and sweet vases when they are all cleaned up.

Sunday, September 16, 2012

Transfer attempt (a craft fail).

The fabulous ladies from Four Marrs and One Venus and Nellie Bellie are hosting a Stinky Linky Party for those crafting, cooking, and DIY projects that don't quite go as planned. I'm sure we all have a few big fails (at least I know I do), and normally they would never see the light of the internet. This linky party gives us bloggers a chance to let it all hang out, and to see that everyone goofs sometimes (which can be easy to forget when we only show off our best work). Make sure to check out the other stinkers, and don't be afraid to show off yours too!

Thursday, August 23, 2012

A birthday card for the kiddos (printable).

I love to give handmade or semi-handmade cards when I have the time, and I try to encourage the children I care for to do the same thing. A few weeks ago, the boys' cousin turned four, and I had them color these cards for him. They had a blast making their cards their own, and the birthday boy thought they were pretty cool too.


Click on the picture to see it full size. Then save it to your desktop, and print it so that the image fills one sheet of card stock (makes 2 cards).
I used a dotted font for the words, so that the boys could practice tracing the letters. You can add the birthday girl's or boy's name to the front using your computer, or by hand after printing. Give your child age appropriate supplies that they will have fun decorating with. We used markers and stickers (the 3 year old opted for mostly markers, and did a nice job tracing the letters and writing his name inside; the 2 year old colored a little, then went crazy with the stickers).

I hope you enjoy these as much as we did :) I link up to these parties.

Thursday, July 12, 2012

Paper star garland (DIY).


Well, I finally got around to taking down the heart garland above my kitchen sink, and I needed something summery to replace it. I love this happy little star garland that took its place.

Tuesday, July 3, 2012

Anniversary photo wall (home decor).


Last month, Matt and I celebrated our one year wedding anniversary! We ate a few bites of (stale, freezer-burned) wedding cake, went out for a lovely dinner, and enjoyed each others company all day. The traditional gift for a one year anniversary is paper, so for part of Matt's gift I put together this photo wall commemorating our love.

Friday, June 29, 2012

Paper American flag (kids' craft).


This is a simple little Fourth of July craft that I did with the three and a half year old that I watch. He had a blast making it, and has been showing it off to everyone. I love that he had so much fun while working on his cutting, coordination, and listening skills too (not to mention practice with colors, shapes, and counting!).

These directions are based on how I did it with him, but this is easy to adjust to other ages/levels of development. I had him cut out the shapes himself (using children's safety scissors of course), but you could do the cutting for younger kids. For older kids, you can give the more autonomy when putting everything together.

Sunday, June 3, 2012

Folded paper stars (DIY).


The idea for these stars has been floating around in my brain for a while now. I kept searching Pinterest for something that matched my idea, but nothing was quite right. One night, I decided to just start playing around with a strip of paper to see what I could come up with, and this is the result. 

I love the way that these stars turned out. They would be perfect scattered around on a dessert buffet; you could string them together to make a garland; they would be excellent decor for Independence day, or a birthday; the possibilities are endless. 

Sunday, March 4, 2012

Fingerprint heart card (DIY).


Matt's birthday was last week, so now I can show you all the birthday card I made for him!

To make the marbled heart, I cut a stencil out of paper, taped it to the card, then used an ink pad and my fingers to fill in the shape. I kept on adding fingerprints until it looked how I wanted it too. You could do this with any colors and any shape.

I really like this stenciling technique, and will definitely use it again in the future.

I freehanded the rest of the card. The lettering is done with a fine paintbrush and acrylic paint; the border is fine tipped Sharpie markers.

Sunday, February 26, 2012

An Irish blessing (printable).

Update: This post received the most views from Julie's St. Patty's link party! Thank you Julie :)


We're hosting our book club today, so I'm finally getting around to taking down our Valentine's day decorations (it's been a busy month!). Our walls looked a little bare without the heart wreath, so I made this sweet printable Irish blessing to take it's place. 

Sláinte is the Irish (or Gaelic) way to say cheers, and means "to your good health." Here is the pronunciation. I love the sentiment of this blessing.

I found this amazing font here. Click on the image to go to the full size version, then drag and drop to your desktop, or right click and select save. The image is sized for an 8 inch by 10 inch frame.

Sharing at:


Oopsey Daisy

Sunday, February 19, 2012

A card for your sweetheart (DIY).


I made this card a few weeks ago to give to the hubby for Valentine's day. Then I realized that I couldn't post it here before I gave it to him, d'oh! Even though I made this for Valentine's day, it would also make a great birthday or anniversary card (or an anytime card! Who says you need an occasion to give a card?).

This is a fairly simple card to make, but I love how the choice of the maps makes it entirely unique and personal for each couple. You can use any places that are meaningful in your relationship. I chose to use Los Angeles (his hometown), Ithaca, NY (my hometown), and San Diego (where we live now). Actually, I was originally going to use three places in San Diego that are special to us, but I screwed up while cutting out the hearts - oops. 

Sunday, February 12, 2012

Incredibly easy paper towel holder (DIY).


We have a tiny kitchen, and counter space is always at a premium. Our paper towels used to sit on the counter top, but a few weeks ago I got fed up and decided I needed a way to suspend the roll from the cabinet in order to free up some precious space. I also decided I needed it IMMEDIATELY (I'm not a very patient person, which frequently leads to me making up quick fixes such as this... admittedly with varying levels of success). I honestly think this took me less than a minute to put up. 

We've been using this for several weeks now, and it works great. The paper raffia is stiff, which makes it easy to thread through the paper towel roll. Of course, this isn't the prettiest solution, but it was free and fast (and we're renting, so I'm not willing to spend much on improving the place). 

~ Update ~
After about two months of use, the raffia ribbon started to fray and eventually snapped. It was easy to replace, and I'm still very happy with the paper towel dispenser. I'll probably replace the raffia with something more durable soon.

Saturday, February 4, 2012

Paper heart garland (tutorial).


We needed a little more Valentine's cheer around our house, so when I saw this felt garland on Pinterest the wheels in my brain started to turn (the original is in Chinese, but the pictures are pretty self explanatory). 

It took me less than an hour to make both garlands, this is such an easy project. Using paper means there's no sewing, plus you probably already have everything you need! I did two slightly different versions, so don't forget to scroll down to see the second one. 

Sunday, January 29, 2012

Lace earring holder (tutorial).


This earring holder is surprising simple to make, looks great, and is an easy way to organize all of your jewelry. These make great gifts too - I love personalizing the frame design to match my friends' styles. This one's mine... kind of boring - I was going to decorate it, but I've been lazy this week. That'll have to be a project for a later date.

This is a very loosely written tutorial because the fun part is making the design uniquely yours. If you make one, I'd love to see a picture of it! Either post a link to it in the comments, or email it to me at MdoubleMcrafts {at} gmail {dot} com.

Sunday, January 15, 2012

Ombre water lily paper flower (tutorial).


These flowers are so much fun to make, and they come out so pretty! I'm planning on incorporating these into my Valentine's day decorations this year  ❤ They also make adorable gift toppers in place of a traditional bow.

Supplies: card stock in 3 colors, glass gem, glue, stapler, scissors
Start by cutting out two flower shapes for each color (print and trace the template at the bottom of this post). Don't worry - this is the slowest, hardest part of making these.


Use your fingers to gently curl the petals upward so that all of your flower shapes look like the one above. 


Stack the bottom five flower shapes together, and arrange to your liking. Staple the layers together using two staples in an X shape (this will ensure the flower stays stable and secure).


Glue the final flower shape into the middle of the flower to cover the staples (I use Elmer's glue for this). Let dry. Glue the glass gem into the center of the flower (I use either super glue or E6000). Adjust the petals if needed. Now take a step back and admire your work!

Flower template - print out to be approximately 4" across

Oopsey Daisy


Saturday, January 7, 2012

A birthday card for Grandma.

My grandma turns 90 later this month, so I decided to make a special birthday card for this very special lady (she's one of my favorite people in the world - strong, smart, kind, & incredibly loving). 


I was inspired to make these flowers by this pin on pinterest. Her favorite color is purple (if you couldn't guess), but you can make this card in any colors you want. 

To get even spacing start by glueing 2 opposing petals, then fill in the rest.
Cut out 6 hearts of equal size for each flower. I used double sided scrapbook paper for the big heart & cardstock for the small ones; any paper stiff enough to hold a sharp crease will work. Fold each heart in half vertically to make petals, then glue the petals onto your card in a flower shape.

I don't have a dark purple ink pad, so I used a marker to ink the stamps.
It takes a little longer, but works great in a pinch.
I used these adorable little letter stamps to write out my message. I got this little stamp set for about $1 from Michael's, and I've gotten so much use out of it! To get the spacing right, I stamped the words right to left (I'm not really left handed, but my right hand was busy with the camera).


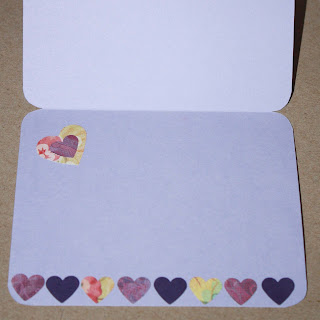
I punched out some more hearts to decorate the inside of the card. Then I decided to round off the corners of the card too - I think it gives it a more finished look.